One of the things (Besides my complete English curriculum) I am best known for on my teacher stores is my Prezis.
I discovered Prezi about three years ago and I LOVE it!
Prezi is similar to a PowerPoint in that they are both presentation tools, but that is where their similarities end.
Prezi Presentations are created on a "canvas" rather than on "slides." This helps to encourage focusing on combining text, pictures and video clips. Items on the canvas can be dragged, tilted, and zoomed to create an engaging look that really grabs students attention. Prezi Presentations are also FANTASTIC for hitting many learning styles at once (especially if you include video clips and pictures like I do)
I personally like incorporating video clips in my Prezis as much as possible (the kids enjoy that as well). I think it is also beneficial for students to see the literary elements we discuss in class brought to life in video clips and in pictures.
I thought I would take some time in this post to explain how to make a simple prezi!
Once you have signed up for an account at Prezi.com click the blue "+ New Prezi" button.
Step one:
Choose a template. I am choosing "Blank" because I want to upload my own image next!
Step Two:
This is your bland and boring main prezi screen. Now let's have some fun creating!
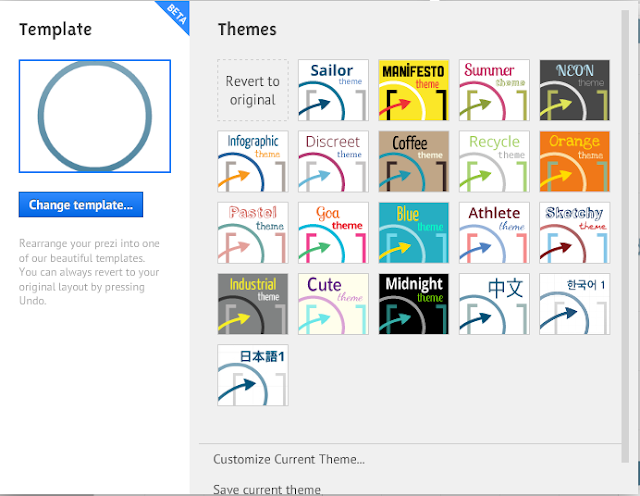
Click "Template in the top bar"
Step ThreeClick "Customize Current Theme"

Step Four
Click "Upload" underneath 3D background and upload a picture from your computer, whatever you would like your background to be. I have chosen a picture of my dogs for the purpose of this tutorial!
Step Five
Once you have uploaded your picture, choose colors that will compliment the picture and choose fonts. Keep clicking the "Next" button until you have chosen all the options possible and once you have click "Done"
Step Six
If your picture is too large scroll out until it fits in the little box on the left. Click "+Add Frame" and choose "Draw Invisible Frame" and draw a frame around your picture. (I like to do this so the picture is centered and becomes the main backdrop, but you do not have to do this!)
Step Seven
You are ready to start adding information to your prezi! Click anywhere on your uploaded picture to add text.
I would suggest placing text in fun places on the picture. Look for places that are fairly solid in color so the text can stand out. All you have to do is use your mouse to scroll into the picture to place the text on fun and dynamic places!
TIP: The more you tilt and space your text the more fun and dynamic the path will be later on
In order to tilt text, images, videos, etc...all you have to do is click the item and go to one of its four corners. A little circle will appear and that will enable you to tilt the object.
Step Eight
I like to add images to my prezis. To do this click "Images" in the top bar and upload an image from your computer or from google (That part is self explanatory). I want to place this picture in the center of my dog's eye so I
- Click on the picture
- Click on the "-" button until it is the size I want it to be
- Click the hand button to move the picture into the correct location
The same rule for images applies for adding video clips to a prezi. You can put links from youtube in or you can place embedded videos in your prezis.
Step Nine
Once you have added all the content you would like to add it is time to create the path!
- Click "Edit Path"
- Click on the items in the order you would like them to appear (They will be highlighted and raise slightly when you pass your mouse over them)
- When you click on each item it will add screen shots of the order in the gray bar on the left and a spider web of the pathway will appear on your image.
- If you forget a path point you have two options:
- The plus signs can be dragged to place a path point on items
- The screen shots can be dragged up and down in the gray bar on the left to change the order
- When you are satisfied with your path click "edit path"again to close it.
Check out your presentation by clicking "Present" in the top bar in blue. Use the arrow keys on your keyboard to move forwards and backwards. When you are done click "esc"on your keyboard or click the X in the top right hand corner.
Step Ten
When you are satisfied with your prezi click the square box with the arrow pointing to the right to save and close your prezi! You can watch your prezi online, or you can download it to your computer! (Just make sure that if you download it to your computer you know how to unzip a compressed folder).Prezis are very simple to create!
I am going to do a series of prezi tutorials in future so keep checking back!
Prezis I have created that are for sale:
Context CluesWriting Process
Plot Diagram
Night Pre Reading
Making Inferences
Text Structure
Figurative Language
Comparative and Superlative Adjectives
Point of View
Theme
Outsiders Pre Reading
Tone and Mood
The Giver Pre Reading
Foreshadowing
Poetry Terms
Hunger Games Pre reading
Catching Fire Pre Reading
Symbolism
Conflict
Ancient China
Anthem Pre Reading
Monster Pre Reading
Animal Farm Pre Reading
Free Learning Styles Prezi


No comments:
Post a Comment